
How to Install a Motorcycle Air Kit: Step-by-Step Guide

Table of Contents
- What's in Your Motorcycle Air Kit and What You'll Need
- Check Compatibility Before You Start
- Removing the Stock Suspension
- Harley-Davidson Air Suspension Installation: Rear and Front
- Mounting the Compressor and Routing Air Lines
- Motorcycle Air Suspension Leak Test and Wiring Check
- Motorcycle Carburetor Adjustment After Air Intake Installation
- Post-Installation Setup and Maintenance
- Frequently Asked Questions
Last Updated: October 14, 2026
What's in Your Motorcycle Air Kit and What You'll Need
Installing a motorcycle air kit is a job most home mechanics can handle in a weekend with basic hand tools. The key is knowing what's in the box, what fits your bike, and the order of operations. This guide from THE SPEED SHOP CANADA walks through every step, from compatibility checks to leak testing.
Kit Components and Hardware
Check every part against the packing list before you touch the bike. Missing fittings stall a build fast.
Confirm the kit matches your motorcycle model and model year.
Motorcycle Air Ride Kit Tools and Workspace
You need a clean, flat space with good light. A lift or center stand makes the job safer.
Gather these motorcycle air ride kit tools:
- Socket set and wrenches
- Torque wrench
- Screwdrivers and pliers
- Hose cutter for clean air line cuts
- Wire strippers and crimps
- Jack stands
- Thread sealant
Check Compatibility Before You Start
Compatibility is the step most riders skip, and it's the one that causes the most returns. Before ordering, confirm your exact model and model year against the kit's fitment list.
Model-Year Fitment for Harley-Davidson and Other Models
Fitment changes between generations. A kit built for an M8 Touring bike won't bolt onto a Twin Cam frame the same way.
For Harley-Davidson, check whether your bike is Touring, Sportster, or another platform. Then match the year range. For other makes, verify the fitment.
If you're unsure, contact us before you buy. We'd rather confirm fitment than have you modify brackets on your garage floor.
| Check | Why It Matters | What to Do |
|---|---|---|
| Model and year | Mounting points change by generation | Match the kit's fitment list |
| Front vs rear | Kits are sold separately | Order the right end |
| Shock length | Wrong length changes ride height | Measure your stock shock |
| Existing mods | Custom frames shift geometry | Ask before ordering |
Removing the Stock Suspension
Support the bike on a stand so the suspension is unloaded. Never work on a bike held up only by a kickstand.
Start with the rear. Remove the seat and side covers to reach the shock mounts. Unbolt the top and bottom shock bolts, then slide the stock shock out.
For the front, you'll typically remove the fork caps and drop the internals. Keep every bolt and spacer in labeled bags. You'll reuse some hardware, and mixing it up wastes time.
Harley-Davidson Air Suspension Installation: Rear and Front
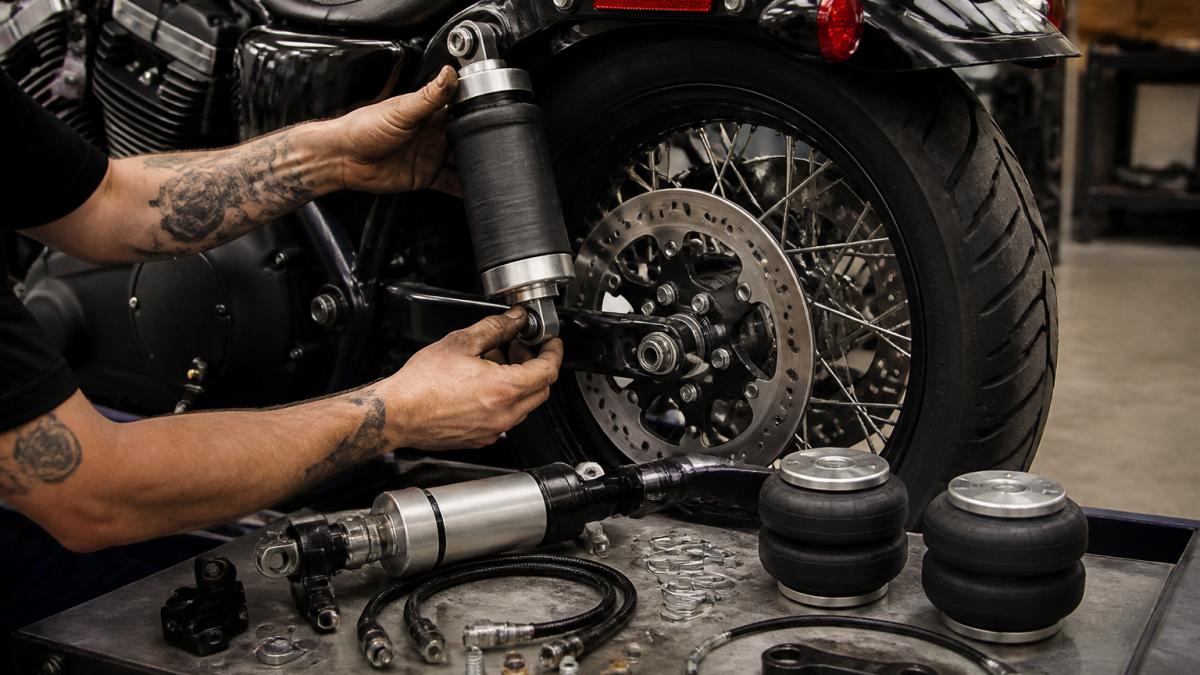
Rear air shock installation is the easier half. Front work takes more patience because you're inside the forks.
Rear Air Shock Installation
Slide the new air shock into the mounts. Line up the top and bottom eyes, then hand-thread the bolts before tightening. Torque to the spec in your installation manual.
Connect the air line to the shock fitting. Route it away from hot exhaust and moving parts. Leave a little slack so the line doesn't pull when the suspension moves.
Front Suspension Installation
Front kits vary. Some use air cartridges, others replace the fork internals. Follow the manual's order exactly.
Install the cartridge kit or air unit, then refit the fork caps. Add air pressure slowly and check for leaks at every fitting. Don't over-inflate; start low and build up.
Mounting the Compressor and Routing Air Lines
Find a spot for the compressor assembly that stays dry, gets airflow, and sits away from direct exhaust radiant heat. Under a side cover, behind a saddlebag, or in a Touring bike's saddlebag cavity are common locations. On baggers, many riders mount the compressor to the frame rail behind the transmission or to a bracket under the right side cover.
Mount it with the supplied brackets. Use rubber isolators or washers if the kit includes them to cut vibration, which is a leading cause of cracked compressor mounts and loosened fittings over time. Keep the compressor body at least a few inches from exhaust headers and mufflers where possible; heat degrades air line and shortens compressor life.
Air Line Routing Rules
Cut air line with a dedicated hose cutter, not side cutters. A pinched or angled cut will not seal, and you will chase a leak you cannot find. Push the line fully into the fitting until it bottoms out, then give a gentle tug to confirm it is seated.
Wiring the Compressor
Wire the compressor to a switched power source so it cannot run with the bike off and drain the battery. Tap a circuit that is live only when the ignition is on, or use a relay triggered by a switched source for higher-current compressors.
FUELING PERFORMANCE BA AIR FILTER KIT HARLEY DAVIDSON TWIN CAMS 99-17 →
Add an inline fuse on the positive lead. Match the fuse rating to the compressor's rated current draw, check the kit manual or the compressor label for the amperage. A fuse that is too small will blow under normal load; one that is too large will not protect the circuit. Most small air-suspension compressors draw in the range of a few amps to low double digits, so a fuse in that range is typical, but always defer to the manufacturer's spec.
Ground the compressor to a clean, bare-metal frame point or a dedicated ground stud. A weak or painted ground is the most common reason a compressor will not run or runs intermittently. Use a star washer to bite through paint, and coat the connection with dielectric grease to slow corrosion.
If the kit includes a pressure switch, wire it in series on the power side so the compressor cuts out at the set pressure. If it includes a gauge or switch panel, route that harness along the same path as the air line, secured and away from heat.
Motorcycle Air Suspension Leak Test and Wiring Check
Pressurize the system and watch the gauge. A good motorcycle air suspension leak test takes a few minutes and saves hours later. If the gauge drops over time with the compressor off, you have a leak. If it holds, move on to the wiring check.
Leak Testing Step by Step
- Inflate the system to a normal riding pressure.
- Spray soapy water on every fitting, the Y fitting, the compressor connections, and the shock air ports.
- Watch for bubbles. Bubbles mean a leak.
- Tighten the fitting or reseat the line, then test again.
- Recheck after a short ride, since heat and vibration can reveal leaks that a cold test misses.
Common leak spots:
- Loose air fittings
- Angled or pinched line cuts
- Missing thread sealant on threaded fittings
- A Y fitting not fully seated
- A line pushed in but not bottomed out in the fitting
Fixing a Leak
If a push-to-connect fitting leaks, release the collar, pull the line out, inspect the cut, and re-cut it square with a hose cutter. Push it back in until it bottoms out, then tug gently to confirm. If a threaded fitting leaks, remove it, apply thread sealant rated for air and the fitting material, and reinstall. Do not overtighten tapered fittings, you can crack the housing.
If a line is pinched, reroute it. A pinched line restricts flow and can cause uneven side-to-side pressure. Look for pinch points at the seat, side covers, and swingarm travel.
Wiring Check and Compressor Troubleshooting
Confirm the compressor kicks on and off with the switch. Listen for the pressure switch cutting power at the set point. If the compressor does not run at all, work through this order:
- Fuse, check the inline fuse first. A blown fuse usually means a short or an undersized rating.
- Ground, verify the ground connection is clean, bare metal, and tight. A weak ground is the most common cause of a compressor that will not run.
- Switch and relay, confirm the switch sends power and, if used, the relay clicks and passes voltage.
- Pressure switch, if the system is already at or above the set pressure, the pressure switch will keep the compressor off. Bleed a little air and retest.
- Compressor motor, if power and ground are good and the motor does not turn, the compressor itself may be faulty.
If the compressor runs but will not build pressure, check for a large leak on the pressure side, a line that popped out of a fitting, or a failed compressor reed valve. Most electrical faults trace back to a weak ground, so check that before replacing parts.
Motorcycle Carburetor Adjustment After Air Intake Installation
If your build added an air intake or filter kit, the engine now breathes differently. That changes the air-fuel mix, so a motorcycle carburetor adjustment after air intake installation may be needed on carbureted bikes.
Fuel-injected models usually need a tuner instead. Either way, don't skip this step. A lean mix runs hot and hurts performance.
For carbureted bikes, check the jetting and idle mixture. For EFI bikes, use a tuner to match the new airflow.
If you're adding an air filter kit to a Harley-Davidson, we stock options like the Feuling BA air cleaner kit for Twin Cam and M8 motors. It lengthens the intake runners and boosts air velocity for balanced flow.

Post-Installation Setup and Maintenance
Set your ride height and stiffness before your first real ride. Start with low pressure, then add air until the bike sits where you want it.
Ride a short loop and recheck everything. Re-torque the shock bolts and inspect the air line for rubbing.
Ongoing maintenance is simple:
- Check air pressure weekly
- Inspect air line for cracks
- Test the compressor monthly
- Recheck fittings after the first few rides
Frequently Asked Questions
How hard is it to install an air ride kit on a motorcycle?
It depends on your mechanical skill. If you're comfortable with basic mechanical tasks, you can install an air filter kit at home. Otherwise, a professional shop is a safer choice.
What tools do you need to install a motorcycle air kit?
You'll need a basic socket set, wrenches, and a torque wrench. A motorcycle lift and a service manual for your specific model can make the job faster and safer.
How do you check motorcycle air suspension for leaks?
After installation, inflate the system to the recommended pressure and spray soapy water on all fittings, the compressor connections, and the air line joints. Bubbles indicate a leak. Tighten or reseat the fitting and retest. A slow pressure drop overnight also signals a leak that needs attention.
Do you need to adjust a motorcycle carburetor after installing an air intake kit?
Yes, if your motorcycle has a carburetor. A high-flow air intake changes the air-fuel mixture, often making it lean. You may need to adjust the idle mixture screw or rejet the carburetor. EFI models typically require a tuner or remap instead. Always check spark plug color and engine response after the change.
Building a custom air ride setup takes patience, but the payoff is a bike that rides and looks exactly how you want. At THE SPEED SHOP CANADA, we stock the performance parts to get you there, from air filter kits to suspension components. We offer free shipping on orders over $200 and flexible financing through Shop Pay, RBC PayPlan, and Sezzle. Add to cart and start your build today.
Quote of the Day
Style is more than what we wear or how we decorate our spaces — it’s the freedom to choose what reflects who we are. Every design, every detail, is crafted with intention: to inspire joy, to add meaning, and to transform the everyday into something extraordinary. Because when comfort meets elegance, life itself feels more beautiful.
Brand Description
At our core, we believe that style should feel effortless yet meaningful. Each collection is carefully designed with attention to detail, blending modern aesthetics with everyday comfort. From timeless silhouettes to refined textures, our pieces are crafted to inspire confidence and elevate the way you live and dress. More than fashion, it’s a lifestyle made for you.